环境准备
接口服务
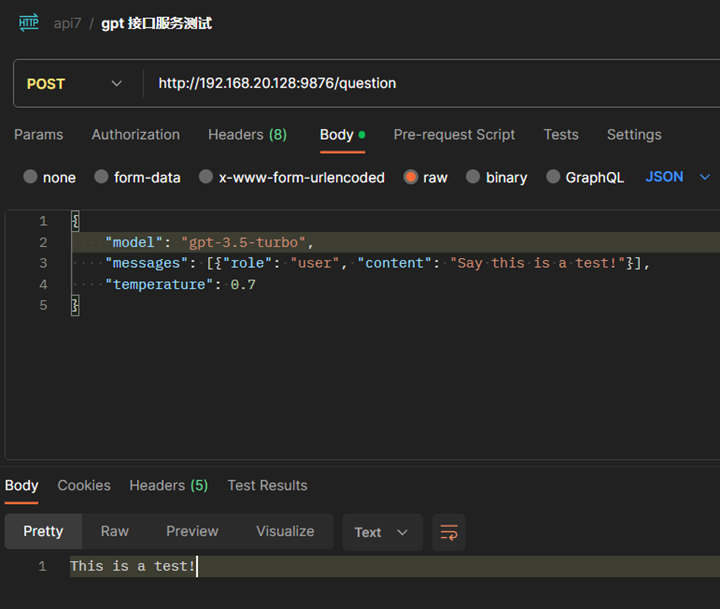
gpt 接口服务(使用 spring boot 编写的 Chat GPT 接口服务),github repo:https://github.com/yuluo-yx/gpt-api-server
调用接口示例:
虚拟机软件:VMware Workstation Pro 17
- Linux 镜像:Ubuntu Server
- 内存:8G
- 硬盘:40G
- CPU 核数: 4
软件环境:
- Docker Version:24.0.4
- Docker Compose Version:v2.20.1
- git Version:2.34.1
- APISIX: APISIX Version:3.4
安装方式
Docker 安装 APISIX
参考 url:https://apisix.apache.org/zh/docs/apisix/installation-guide/
- clone 项目;
- cd apisix-docker/example;
- 修改 example/apisix-conf 中 config.yaml 中的 etcd 的地址;
- docker-compose -p docker-apisix up -d;
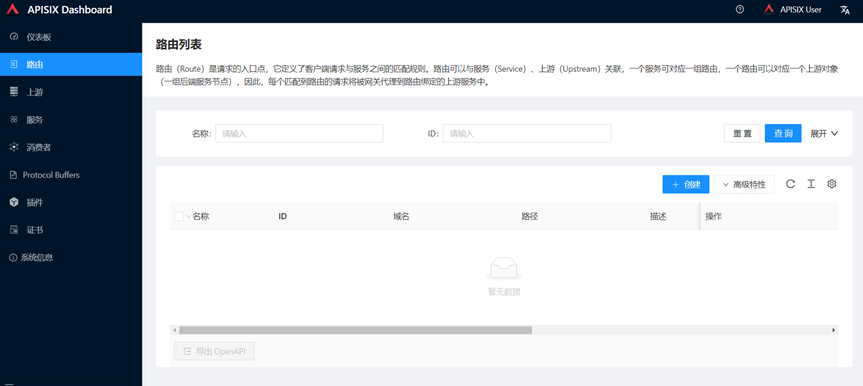
- 访问 APISIX Dashboard:
ip:9000
K8s helm 安装
基础环境安装
-
下载 kubectl
curl -LO "https://dl.k8s.io/release/$(curl -L -s https://dl.k8s.io/release/stable.txt)/bin/linux/amd64/kubectl" -
安装
sudo install -o root -g root -m 0755 kubectl /usr/local/bin/kubectl
-
验证
kubectl version --client --output=yaml
-
安装 minikube
github repo: https://github.com/kubernetes/minikube/releases?page=2?minikube-1.23.1-0.x86_64.rpm
rpm -ihv minikube-1.23.1-0.x86_64.rpm -
启动
minikube start --force --driver=docker --image-repository=http://registry.cn-hangzhou.aliyuncs.com/google_containers -
出现如下表明安装成功
root@yuluo-ubuntu:/home/yuluo# kubectl get pods -A
NAMESPACE     NAME                               READY   STATUS    RESTARTS   AGE
kube-system   coredns-7d89d9b6b8-fmj2q           1/1     Running   0          101s
kube-system   etcd-minikube                      1/1     Running   0          113s
kube-system   kube-apiserver-minikube            1/1     Running   0          115s
kube-system   kube-controller-manager-minikube   1/1     Running   0          113s
kube-system   kube-proxy-c2wrh                   1/1     Running   0          102s
kube-system   kube-scheduler-minikube            1/1     Running   0          113s
kube-system storage-provisioner 1/1 Running 0 113s -
安装 helm
wget https://get.helm.sh/helm-v3.7.1-linux-amd64.tar.gz
tar -xvf helm-v2.16.0-linux-amd64.tar.gz
cd linux-amd64
chmod +x helm && mv helm /usr/local/bin/


# 版本检测

root@yuluo-ubuntu:/app/apisix-helm# helm version
version.BuildInfo{Version:"v3.7.1", GitCommit:"1d11fcb5d3f3bf00dbe6fe31b8412839a96b3dc4", GitTreeState:"clean", GoVersion:"go1.16.9"}

# 出现上述信息安装成功

# 初始化 helm
helm init
使用 helm 安装 apisix
helm repo add apisix https://charts.apiseven.com
helm repo update
helm install apisix apisix/apisix --create-namespace  --namespace apisix

# 显示结果如下,证明启动成功!
root@yuluo-ubuntu:/app/apisix-helm# kubectl get pods -n apisix
NAME                      READY   STATUS    RESTARTS   AGE
apisix-6c995768f5-5nhhb   1/1     Running   0          5m3s
apisix-etcd-0             1/1     Running   0          5m3s
apisix-etcd-1             1/1     Running   0          5m3s
apisix-etcd-2             1/1     Running   0          5m3s
问题解决
-
安装 minikube 时 rpm: RPM should not be used directly install RPM packages, use Alien instead! 需要将 rpm 的包转换为 DEB 的包
sudo apt-get install alien fakeroot
fakeroot alien package.rpm
sudo dpkg -i package.deb
完成安装!
-
使用新版本的 helm 可以避免很多问题
RPM 安装
-
通过 RPM 官方仓库安装
sudo yum install -y https://repos.apiseven.com/packages/centos/apache-apisix-repo-1.0-1.noarch.rpm
sudo yum install apisix -
通过离线方式安装
sudo mkdir -p apisix
sudo yum install -y https://repos.apiseven.com/packages/centos/apache-apisix-repo-1.0-1.noarch.rpm
sudo yum clean all && yum makecache
sudo yum install -y --downloadonly --downloaddir=./apisix apisix

sudo yum install ./apisix/*.rpm -
在安装之前都需要先安装 etcd 服务,因为 apisix 通过 etcd 作为存储服务组件!
DEB 安装
-
首先确定系统架构
-
根据系统架构选择合适的仓库进行安装
echo "deb http://openresty.org/package/debian bullseye openresty" | sudo tee /etc/apt/sources.list.d/openresty.list
wget -O - https://openresty.org/package/pubkey.gpg | sudo apt-key add -
wget -O - http://repos.apiseven.com/pubkey.gpg | sudo apt-key add -
echo "deb http://repos.apiseven.com/packages/debian bullseye main" | sudo tee /etc/apt/sources.list.d/apisix.list

# 进行更新安装
sudo apt update
sudo apt install -y apisix=3.0.0-0 -
在安装之前都需要先安装 etcd 服务,因为 apisix 通过 etcd 作为存储服务组件!
问题解决
-
Warning! Current maximum number of open file descriptors [1024] is not greater than 1024, please increase user limits by execute
ulimit -n <new user limits>, otherwise the performance is low 会对性能造成影响,但不影响使用,可以通过ulimit -n args进行配置。 -
本地运行需要安装 etcd 服务!
使用 APISIX 对接口进行保护(使用 Docker 测试)
-
发布服务
进入
/app/apisix/test-scripts目录下,执行create-upstreamonce.sh脚本,将 gpt 接口服务发布到 apisix 网关发布服务测试,可以使用 Postman 脚本中的 网关服务发布测试 请求。或者使用目录中的
test-route.sh脚本测试 -
保护服务
限流规则保护:在一分钟之内只能请求指定 api 接口两次,进入
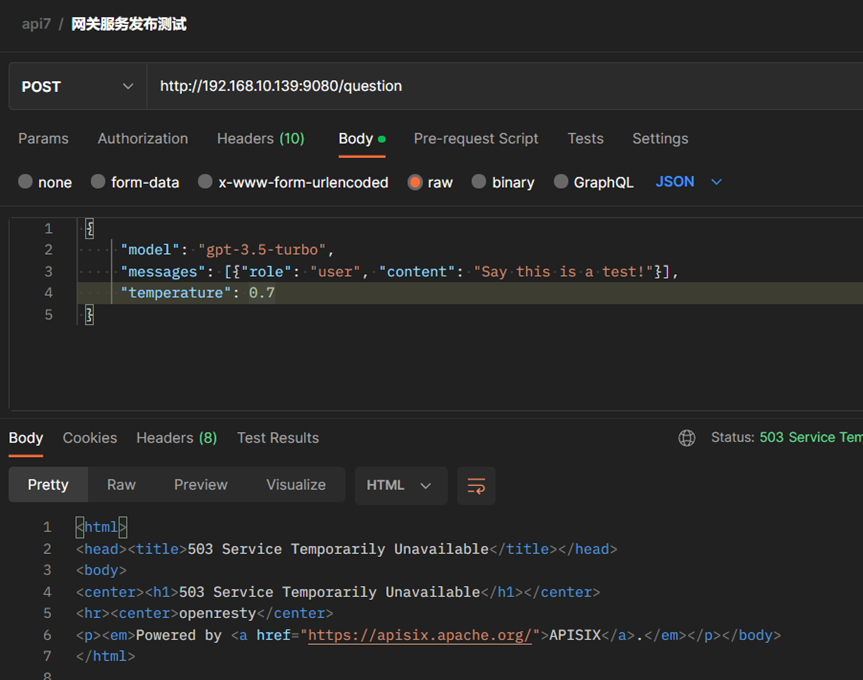
/app/apisix/test-scripts目录下,执行limit-count.sh发布此限流规则,使用 Postman 脚本中的 网关服务发布测试 请求,在一分钟发送 > 2次的请求查看效果。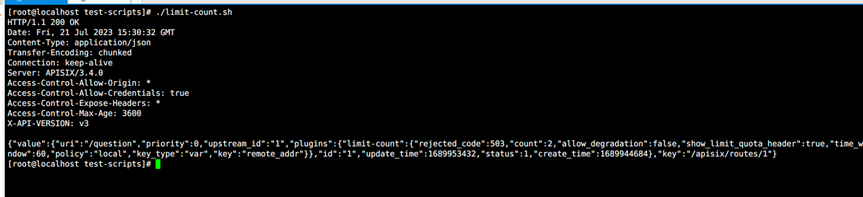
发送次数大于 2 时,请求出错:
限制客户端对服务的并发请求数:同一时间之内,只能有一个请求发送至api 接口。进入
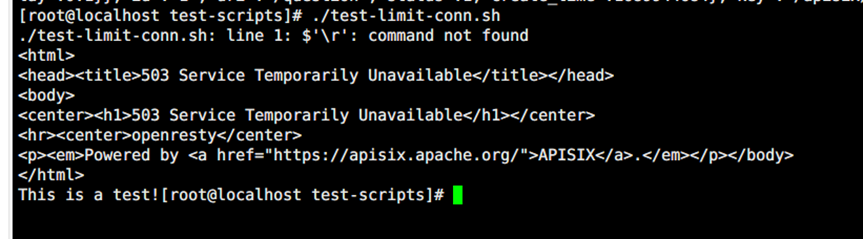
/app/apisix/test-scripts目录下,执行limitconn.sh发布此规则,执行同一目录下的test-limit-conn.sh脚本,查看效果。
当有多个请求同时发送至接口时:
限制请求速率:单个客户端对服务的请求速率,进入 /app/apisix/testscripts 目录下,执行 limit-req.sh 发布此规则,执行同一目录下的test-limit-res.sh 脚本,查看效果。

请求速率超出时:

对于 APISIX Gateway 的理解
网关项目对比
-
Kong:
Kong 作为一个 API 网关,提供了了如下能力:负载均衡,缓存,限流重试等,确保 API 的高可用性和性能。拥有丰富的插件生态,开发者可以通过插件扩展和定制功能。同时,Kong 网关还支持微服务治理功能,可以对常见的服务注册中心进行整合,实现对微服务的动态管理和监控。也提供可视化界面,方便进行 API 和功能插件的配置。
-
APISIX:
APISIX和 Kong 网关类似,同样具有丰富的插件生态,开发者可以通过编写不同语言的插件来和 ApiSix 无缝集成,满足各种不同网关场景需求。提供控制台来对 API 和插件进行管理。
-
Spring Cloud Gateway:
Spring Cloud Gateway 是一个基于 Spring 的网关项目,主要使用过滤器链的方式来实现各种网关功能。背靠 Spring 项目,可以依赖 Spring Boot 的自动配置和约定大于配置的原则,简化开发,更快速的和 Spring 项目集成。但是不提供服务控制台,通过 Spring Boot Actuator 来监控各项性能指标。
优缺点对比
- 优点:
APISIX 相比 Kong 网关,有以下的优势:
○ 国内生态完善; ○ 在功能粒度方面更加细致,支持更多的功能插件,同时也 wasm 插件机制; ○ 使用 ETCD 存储,避免和数据库的耦合。 ○ APISIX 相当于 Spring Cloud Gateway: ○ 提供控制台功能,方便管理 API 和插件; ○ 灵活的插件机制,开发者可以通过插件来扩展和定制不同网关场景下的需求; ○ 采用 Lua 语言编写,有更加优越的性能表现。
- 缺点:
APISIX 相当于 Spring Cloud Gateway:
○ 相比于 Spring Cloud Gateway,在社区规模和用户支持,用户教程方面略有不及。 ○ 不及 Gateway 网关项目成熟。
相比于 Kong 网关的缺点:
○ 支持的服务注册中心有限,不支持 Zookeeper 和 Consule ; ○ 插件生态不及 Kong 网关; ○ 官方文档不够完善,对于小白用户学习难度较大; ○ 社区生态不及 Kong 网关活跃; ○ 未提供命令行界面,在不使用控制台的情况下,只能使用 API 进行管理。
Compile APISIX From Source Code (base APISIX-base)
参考官网:https://apisix.apache.org/zh/docs/apisix/building-apisix/
编译安装
-
安装 git
yum install git
-
安装依赖项
curl https://raw.githubusercontent.com/apache/apisix/master/utils/install-dependencies.sh -sL | bash -
-
创建目录并设置环境变量
APISIX_VERSION='3.4.0'
mkdir apisix-${APISIX_VERSION} -
Clone
git clone --depth 1 --branch ${APISIX_VERSION} https://github.com/apache/apisix.git apisix-${APISIX_VERSION} -
创建依赖项并安装
cd apisix-${APISIX_VERSION}
make deps
make install -
安装 etcd
ETCD_VERSION='3.4.18'
wget https://github.com/etcd-io/etcd/releases/download/v${ETCD_VERSION}/etcd-v${ETCD_VERSION}-linux-amd64.tar.gz
tar -xvf etcd-v${ETCD_VERSION}-linux-amd64.tar.gz && \
cd etcd-v${ETCD_VERSION}-linux-amd64 && \
sudo cp -a etcd etcdctl /usr/bin/
nohup etcd >/tmp/etcd.log 2>&1 & -
初始化 apisix 配置
apisix init -
测试
运行以下命令测试配置文件,APISIX 将根据 config.yaml 生成 nginx.conf,并检查 nginx.conf 的语法是否正确。
apisix test -
运行
apisix start -
停止
如果需要停止 APISIX,你可以使用 apisix quit 或者 apisix stop 命令。
>apisix quit 将正常关闭 APISIX,该指令确保在停止之前完成所有收到的请求。
apisix quit
> apisix stop 命令会强制关闭 APISIX 并丢弃所有请求。
apisix stop -
卸载
make uninstall && make undeps
错误解决
-
执行 curl https://raw.githubusercontent.com/apache/apisix/master/utils/install-dependencies.sh -sL | bash - 命令时无效
复制 https://raw.githubusercontent.com/apache/apisix/master/utils/install-dependencies.sh 内容,
vim instll-dependency.sh
chmod +x install-dependency.sh
./install-dependency.sh 安装依赖 -
shell 脚本执行到 install_rust 时,速度太慢
手动安装
curl --proto '=https' --tlsv1.2 -sSf https://sh.rustup.rs | sh

# 出现 1,2,3选项时,选择 default。

source $HOME/.cargo/env
再次执行脚本!
-
make deps 时 报错 luarocks:command not found
[ info ] WARNING: You're not using LuaRocks 3.x; please remove the luarocks and reinstall it via https://raw.githubusercontent.com/apache/apisix/master/utils/linux-install-luarocks.sh make: *** [Makefile:163: deps] Error 1 curl https://raw.githubusercontent.com/apache/apisix/master/utils/linux-install-luarocks.sh -sL | bash - 如果安装失败,手动复制脚本文件执行,执行时需要使用 dos2unix 转变编码,避免出现错误
dos2unix linux-install-luarocks.sh如果在执行 wget -q https://github.com/luarocks/luarocks/archive/v3.8.0.tar.gz 卡顿可以配置 git 代理
git config --global https.proxy http://192.168.2.9:1080
git config --global http.proxy http:///192.168.2.9:1080
还是不行就手动下载上传到 linux 的 tmp 文件下,修改 脚本中的路径再次执行脚本,更改后的脚本如下:
LUAROCKS_VER=3.8.0
wget -q https://github.com/luarocks/luarocks/archive/v"$LUAROCKS_VER".tar.gz
tar -xf v"$LUAROCKS_VER".tar.gz
rm -f v"$LUAROCKS_VER".tar.gz
cd luarocks-"$LUAROCKS_VER" || exit

tar -xf /tmp/luarocks-3.4.0.tar.gz
rm -f /tmp/luarocks-3.4.0.tar.gz
cd luarocks-3.4.0 || exit -
换成 ubuntu 操作之后,问题得到解决:
参考:https://blog.csdn.net/qq_52397471/article/details/132212714
-
fatal: unable to connect to github.com: github.com[0: 20.205.243.166]: errno=Connection refused
执行配置如下:
git config --global url.https://github.com/.insteadOf git://github.com/如果出现个别安装失败,再次执行 ``make deps` 命令 -
make install 之后 执行 apisix init 显示 bash: /usr/bin/apisix: /bin/bash^M: bad interpreter: No such file or directory
dos2unix apisix
-
执行 apisix init 报错 /usr/local/openresty//luajit/bin/luajit: cannot open /usr/local/apisix/apisix/cli/apisix.lua: No such file or directory
将 apisix-3.4.0 下面的 apisix目录 移动到 /usr/local/apisix 下
-
再次执行 apisix 时,提示部分包模块缺失
使用 luarocks install module 安装 或者去官网下载安装
-
源码编译完成!
Understand APISIX Plugin System(Scenarios, Usage, Working, Mechanism)
理解 APISIX 的插件机制(主要以 java 插件为例)
概述
apache-apisix-java-runner:可以理解为 APISIX 和 java 语言之间的一个桥梁,通过 java runner 可以把 java 编写的代码直接应用到 APISIX 的插件开发中,为 java 语言的开发者使用 APISIX 提供了便利。
运行机制
下图为 APISIX 的插件机制架构图:
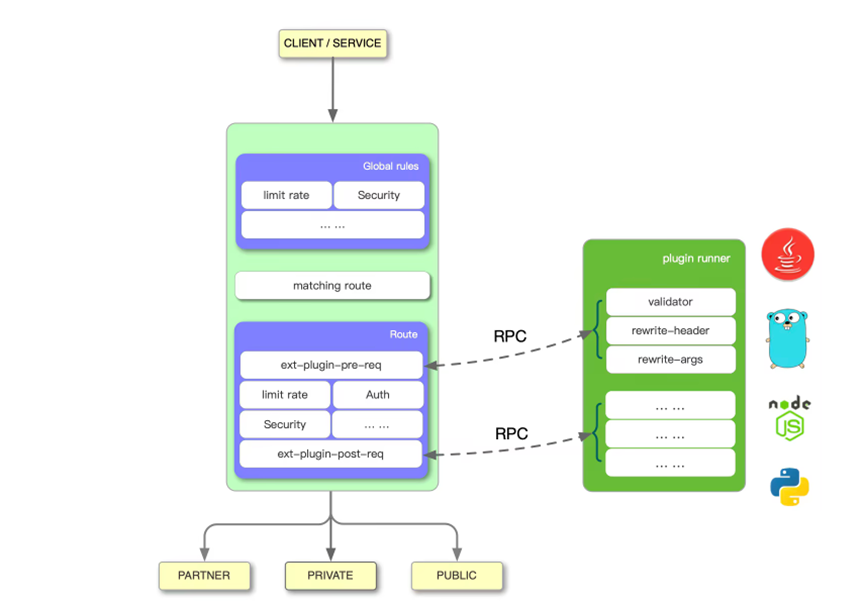
上图左边是 Apache APISIX 的工作流程,右边的 Plugin Runner 是各语言的插件运行器, apisix-java-plugin-runner 就是支持 java 语言的 Plugin Runner。 当在 Apache APISIX 中配置一个 Plugin Runner 时,Apache APISIX 会启动一个子进程运行 Plugin Runner,该子进程与 Apache APISIX 进程属于同一个用户,当重启或重新加载 Apache APISIX 时,Plugin Runner 也将被重启。 如果为一个给定的路由配置了 ext-plugin-* 插件,请求命中该路由时将触发 Apache APISIX 通过 Unix Socket 向 Plugin Runner 发起 RPC 调用。调用分为两个阶段:
• ext-plugin-pre-req :在执行 Apache APISIX 内置插件(Lua 语言插件)之前 • ext-plugin-post-req :在执行 Apache APISIX 内置插件(Lua 语言插件)之后
同时可以根据需要选择并配置 Plugin Runner 的执行时机。
Plugin Runner 会处理 RPC 调用,在其内部创建一个模拟请求,然后运行多语言编写的插件,并将结果返回给 Apache APISIX。 多语言插件的执行顺序是在 ext-plugin-* 插件配置项中定义的,像其他插件一样,它们可以被启用并在运行中重新定义。
使用
-
创建一个 spring boot 项目,根据文档所示编写 pom 依赖和过滤器类文件,代码如下所示:
package indi.yuluo.apisixjavapluginrunnerdemo.filter;

import java.util.ArrayList;
import java.util.List;
import java.util.Map;

import org.apache.apisix.plugin.runner.HttpRequest;
import org.apache.apisix.plugin.runner.HttpResponse;
import org.apache.apisix.plugin.runner.filter.PluginFilter;
import org.apache.apisix.plugin.runner.filter.PluginFilterChain;
import org.slf4j.Logger;
import org.slf4j.LoggerFactory;

/**
 * @author yuluo
 * @author 1481556636@qq.com
 */

public class ApiSixFilter implements PluginFilter {

    private final Logger log = LoggerFactory.getLogger(ApiSixFilter.class);

    @Override
    public String name() {

        return "ApiSixFilter";
    }

    @Override
    public void filter(HttpRequest request, HttpResponse response, PluginFilterChain chain) {

        log.info("ApiSix Filter is running ……");

        String body = request.getBody();
        log.info("Request Body: {}", body);
        String path = request.getPath();
        log.info("Request Path: {}", path);
        Map<String, String> headers = request.getHeaders();
        headers.forEach((k, v) -> log.info("Request Header key: {}, value: {}", k, v));

        chain.filter(request, response);
    }

    /**
     * If you need to fetch some Nginx variables in the current plugin,
     * you will need to declare them in this function.
     * @return a list of Nginx variables that need to be called in this plugin
     */
    @Override
    public List<String> requiredVars() {
        List<String> vars = new ArrayList<>();
        vars.add("remote_addr");
        vars.add("server_port");
        return vars;
    }

    /**
     * If you need to fetch request body in the current plugin,
     * you will need to return true in this function.
     */
    @Override
    public Boolean requiredBody() {

        return true;
    }

}
<?xml version="1.0" encoding="UTF-8"?>
<project xmlns="http://maven.apache.org/POM/4.0.0" xmlns:xsi="http://www.w3.org/2001/XMLSchema-instance"
xsi:schemaLocation="http://maven.apache.org/POM/4.0.0 https://maven.apache.org/xsd/maven-4.0.0.xsd">
<modelVersion>4.0.0</modelVersion>
<parent>
<groupId>org.springframework.boot</groupId>
<artifactId>spring-boot-starter-parent</artifactId>
<version>2.7.14</version>
<relativePath/> <!-- lookup parent from repository -->
</parent>
<groupId>indi.yuluo</groupId>
<artifactId>apisix-java-plugin-runner-demo</artifactId>
<version>2023.8.14</version>
<name>apisix-java-plugin-runner-demo</name>
<description>apisix-java-plugin-runner-demo</description>
<packaging>jar</packaging>
<properties>
<java.version>11</java.version>
<maven.compiler.source>11</maven.compiler.source>
<maven.compiler.target>11</maven.compiler.target>
</properties>
<dependencies>
<dependency>
<groupId>org.springframework.boot</groupId>
<artifactId>spring-boot-starter-web</artifactId>
</dependency>
<dependency>
<groupId>org.springframework.boot</groupId>
<artifactId>spring-boot-starter</artifactId>
<exclusions>
<exclusion>
<groupId>ch.qos.logback</groupId>
<artifactId>logback-classic</artifactId>
</exclusion>
<exclusion>
<groupId>org.apache.logging.log4j</groupId>
<artifactId>log4j-to-slf4j</artifactId>
</exclusion>
</exclusions>
</dependency>
<dependency>
<groupId>org.springframework.boot</groupId>
<artifactId>spring-boot-starter-test</artifactId>
<scope>test</scope>
</dependency>
<dependency>
<groupId>org.apache.apisix</groupId>
<artifactId>apisix-runner-starter</artifactId>
<version>0.4.0</version>
</dependency>
</dependencies>
<build>
<plugins>
<plugin>
<groupId>org.springframework.boot</groupId>
<artifactId>spring-boot-maven-plugin</artifactId>
<configuration>
<executable>true</executable>
<layout>JAR</layout>
</configuration>
</plugin>
</plugins>
</build>
</project>server:
port: 30001
spring:
application:
name: apisix-java-plugin-runner
# apisix 插件配置
cache.config:
expired: ${APISIX_CONF_EXPIRE_TIME}
capacity: 1000
socket:
file: ${APISIX_LISTEN_ADDRESS} -
在 ubuntu server 上配置参数
在
./conf/config.yaml中配置如下参数ext-plugin:
path_for_test: /tmp/runner.sock
cmd: ['java', '-jar', '-Xmx4g', '-Xms4g', '/app/apisix-java-plugin-demo/apisix-java-plugin-runner-demo-2023.8.14.jar'] -
在 ubuntu 上启动 apisix 网关服务
apisix start -
查看 apisix 服务
root@yuluo-ubuntu:/usr/local/apisix/logs# ps -ef | grep apisix
root       11740       1  0 07:16 ?        00:00:00 nginx: master process /usr/bin/openresty -p /usr/local/apisix -c /usr/local/apisix/conf/nginx.conf
root       11796   11747 43 07:16 ?        00:00:10 java -jar -Xmx4g -Xms4g /app/apisix-java-plugin-demo/example/apisix-plugin/apisix-java-plugin-runner-demo-2023.8.14.jar
root       11845    2509  0 07:16 pts/1    00:00:00 grep --color=auto apisix
可以看到插件正常启动。
-
发布 api 接口并创建路由插件规则
root@yuluo-ubuntu:/usr/local/apisix/conf# curl "http://127.0.0.1:9180/apisix/admin/routes/1" -H "X-API-KEY: edd1c9f034335f136f87ad84b625c8f1" -X PUT -d '{"methods": ["POST"],"uri": "/question","plugins":{"ext-plugin-pre-req":{"conf":[{"name":"ApiSixFilter", "value":"bar"}]}},"upstream": {"type": "roundrobin","nodes": {"127.0.0.1:9876": 1}}}'

{"key":"/apisix/routes/1","value":{"upstream":{"pass_host":"pass","nodes":{"192.168.20.129:9876":1},"type":"roundrobin","scheme":"http","hash_on":"vars"},"create_time":1691996598,"uri":"/question","status":1,"plugins":{"ext-plugin-pre-req":{"allow_degradation":false,"conf":[{"name":"ApiSixFilter","value":"bar"}]}},"id":"1","priority":0,"update_time":1691996598,"methods":["POST"]}} -
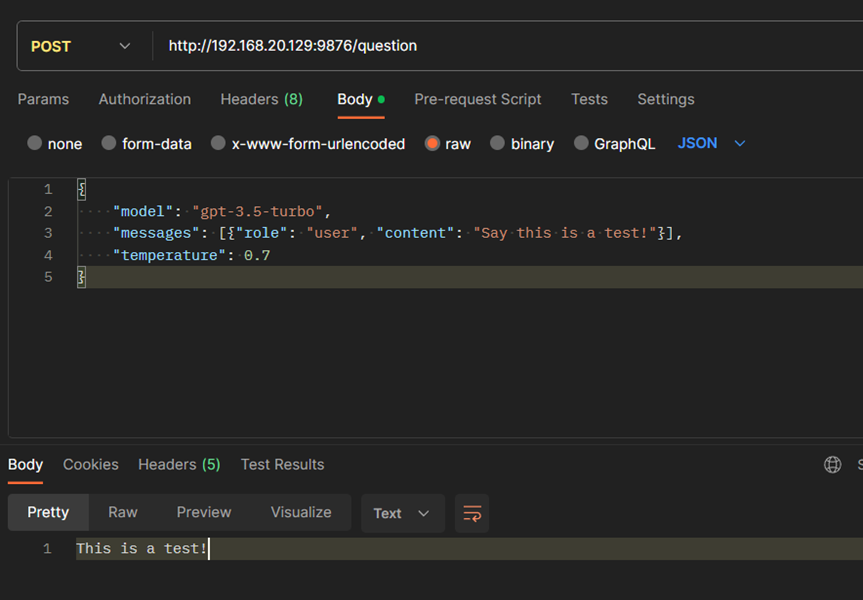
请求接口,查看响应内容
- 接口功能测试
- 通过 apisix 网关端口进行访问测试
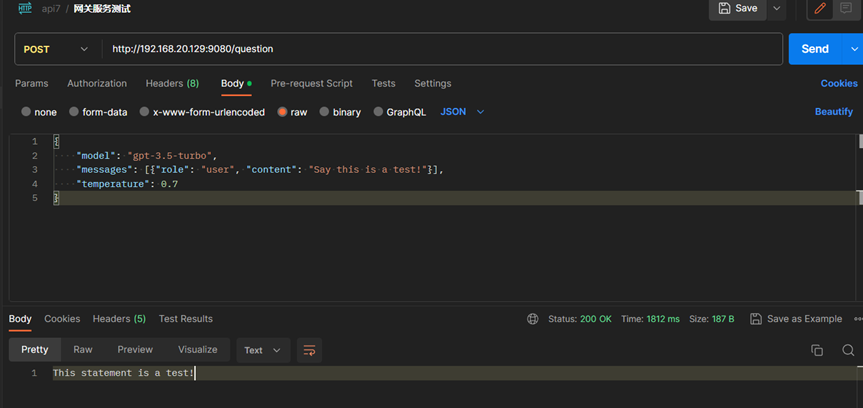
APISIX 网关日志如下:

-
查看打印的日志消息
日志信息如下:

问题记录
-
mvn 打包失败
问题描述:
Failed to execute goal org.apache.maven.plugins:maven-compiler-plugin:3.10.1:compile (default-compile) on project apisix-java-plugin-runner-demo: Fatal error compiling: 无效的目标发行版: 11 -> [Help 1]打包时出现,因为 系统环境变量中的 java 版本和 pom 中指定的 java 版本不一致导致的问题。更改系统环境变量中的 java 版本再次打包即可! -
需要安装 java 运行时环境,不然可能出现插件运行失败的情况!